1426
Steam Deck
18802 readers
826 users here now
A place to discuss and support all things Steam Deck.
Replacement for r/steamdeck_linux.
As Lemmy doesn't have flairs yet, you can use these prefixes to indicate what type of post you have made, eg:
[Flair] My post title
The following is a list of suggested flairs:
[Discussion] - General discussion.
[Help] - A request for help or support.
[News] - News about the deck.
[PSA] - Sharing important information.
[Game] - News / info about a game on the deck.
[Update] - An update to a previous post.
[Meta] - Discussion about this community.
Some more Steam Deck specific flairs:
[Boot Screen] - Custom boot screens/videos.
[Selling] - If you are selling your deck.
These are not enforced, but they are encouraged.
Rules:
- Follow the rules of Sopuli
- Posts must be related to the Steam Deck in an obvious way.
- No piracy, there are other communities for that.
- Discussion of emulators are allowed, but no discussion on how to illegally acquire ROMs.
- This is a place of civil discussion, no trolling.
- Have fun.
founded 4 years ago
MODERATORS
1427
1428
1429
1430
1431
1432
1433
1434
photo of the back https://lemmy.jacaranda.club/pictrs/image/aa74a32e-b453-4cc2-9845-7ae73d415860.jpeg
build was pretty smooth, having the right set of tools really helped a ton. bought the full ifixit screen removal set. happy to answwr any questions for anyone that is thinking about trying this!

1435
1436
1437
1438
1439
This guide presents 3 different ways to play flash games on your deck, ordered by complexity. This is actually a remake of a guide I had previously made on Reddit, but seeing as that platform is failing, I wanted to move this guide elsewhere, taking the time to recreate it.
Here are some videos covering the stuff here (not by me, though):
- Basic Guide (Discover Store Method)
- Intermediate Guide (Flashpoint Method)
- Troubleshooting with the Intermediate Guide
Basic Guide (Discover Store Method)
To start off, first open up the Discover Store and search "Adobe Flash Player". Install the entry that looks like this:

Next, acquire some SWF files (flash games). You can find these in many places, but I've found that a game's speedrun page will most likely have the SWF file for that game. After downloading, use the Dolphin file manager to place these files in an easy to find spot.

Finally, open up the Flash Player installed from the Store. At the top left of the window, hit File > Open. Select any of the SWF files you've acquired. You are now playing a Flash game.

You can make a custom control configuration for Flash by adding the Flash Player as a non-steam game. This will enable you to use keyboard controls with your Deck's inputs. (At this point however, you might as well use the next guide).
Limitations with this method
- Unable to play most Flash Games (see beginning of Intermediate Guide)
- Requires you to search for SWF files
- Only 1 app, therefore only 1 controller configuration possible for all of your flash games
Benefits with this method
- All Flash Games are in one place with little extra configuration
Intermediate Guide (Flashpoint + Proton)
You may have noticed with the Basic Guide that some (if not most) Flash Games do not work. This is because many Flash Games rely on a connection to an external server; the Discover Store Flash Player cannot simulate this connection. Another app, Flashpoint, does simulate this connection, and is what will be installed in this guide.
Installing Flashpoint & CLIFp
Begin by going to the Flashpoint download page and downloading the Windows EXE of Flashpoint Infinity.

Next, open up Dolphin and find the downloaded file. Change its extension from .exe to .7z. Open the file with Ark and extract its contents to a place that's easy to find.

Your Flashpoint folder should now look like this.

We will now need to download an app called CLIFp, which we need as Flashpoint's normal GUI crashes on Steam Deck. Go to the releases page of CLIFp and Download the latest Windows Static build.

Extract the contents with Ark, and find CLIFp.exe under bin/. Move CLIFp.exe to the Flashpoint folder.

Your Flashpoint folder should now look like this.

Adding Games
Once CLIFp is in the correct place, add CLIFp.exe as a non-steam game. Go to the properties page for CLIFp, and enable Proton for CLIFp (any modern version should work).

All that's left is to specify which game CLIFp should launch. Go to the Flashpoint Search Tool, and search for the game you want to play. Find its ID (xxxxxxxx-xxxx-xxxx-xxxx-xxxxxxxxxxxx), and copy it.

With the ID copied, all that's left is to add some launch options to CLIFp. Open up the properties page for CLIFp again, and under launch options, add play -i [ID], where [ID] is the ID you previously copied. Now, your game is ready to play.

You can add as many CLIFp non-steam games for as many Flash games as you want to play. Do be aware of the following limitations, however.
Limitations with this method
- Each flash game requires a ~200MB Proton prefix that gets stored on the Deck's internal drive. This fills up storage quickly, depending on how many games you wish to play.
- Some games (much less than with the Basic Guide) still do not work. Some may show a white screen, others may not play properly.
Benefits with this method
- Much more Flash games work this way.
- Each Flash game can have its own custom controller configuration
- You do not need to search for game SWFs
Advanced Guide (Flashpoint Script)
This guide requires the most setup, but will provide the best possible experience.
Acquiring Scripts
Before starting the Advanced Guide, install Flashpoint and CLIFp. This is covered in the first few steps of the Intermediate Guide. You can continue with the advanced guide once CLIFp.exe is in the correct place.
You will need to acquire 2 user scripts for this step. Check out and download each script, making sure to place them in your Flashpoint directory and setting each as executable in their properties:
Each script targets Proton 7.0 by default. If you want to use a different version of Proton to run your games, you will need to go into the scripts and change the path in $proton_bin.
Script 1 plays games through Flashpoint, and should be used by default. If a game does not work with Script 1 (white screen), you may try Script 2 (YMMV with it, however).
I recommend renaming each script. I renamed Script 1 to fp.sh and Script 2 to fp-direct.sh.

Acquiring wmctrl
You will also need wmctrl. You don't need to disable readonly mode to do this, just download the package here. Create a directory called .wmctrl/ in the Flashpoint directory, and place the extracted contents of the package in it. (You can remove everything other than the usr/ file if you want.)

Adding & Configuring Games
With your scripts in place, go to the Flashpoint Search Tool, and search for the game you want to play. Find its ID and copy it.
Now you can add Script 1 as a non-steam game. After adding the script, go to its Launch Options. Add --uuid [ID], where [ID] is the ID you copied previously. Launch the game once; if you see a white screen, try using Script 2 instead.

Configuring Window Size
These next few steps are not strictly necessary, but they allow you to configure the window size for the best experience in Gaming mode.
With the game open in desktop mode, make note of the window title and the size of the game window while not in fullscreen. Use the size of the game window to calculate its aspect ratio (divide width by height). Spectacle (the screenshot tool) may be useful as it allows you to see how large any part of the screen is.
If you want to use the original window size, simply use the measurements you got. If you want to fill the Deck's screen size, use 800 for the height and 800 * the aspect ratio for the width.
Go into the game properties for the Flash game. Add --winname [name] --width [width] --height [height], where [name] is the name of the window, [width] is the desired width, and [height] is the desired height. Now, the game will automatically resize itself after starting up.

Limitations with this method
- Configuring window sizes can be tedious for every single game
Benefits with this method
- No need to bind a "fullscreen" key for a controller configuration
- Does not generate a large proton prefix for each Flash game (only 1)
Bonus Guides
These are just some extra guides that I feel could be potentially useful.
Flash Game Launcher (for Advanced Users)
You may miss having one place to play all of your Flash Games from the Basic Guide, or you may want something like EmulationStation for Emulated Games. While there isn't a solution specifically for Flash Games, I've found Pegasus Frontend to be good for this purpose.

In order to add Flash Games to Pegasus, you must first set up the scripts present in the Advanced Guide. With that done, a basic metadata.pegasus.txt file for Flash Games (with the script called fp.sh) should look like this:
collection: Adobe Flash
shortname: flash
command: /path/to/Flashpoint/fp.sh --uuid "{file.basename}"


game: My Flash Game
file: 16b04977-f714-4239-b343-b759e16a33af
...


game: My Other Flash Game
file: a8591065-1c64-4242-a2fc-99f16766aed9
command: /path/to/Flashpoint/fp.sh --uuid "{file.basename}" --winname "Adobe Flash Player" --width 1066 --height 800
...
Using Bottles instead of Proton
Though Proton is a useful option, you are able to do the same thing with Bottles.
You'll first need to enable all file access for Bottles. This can be done with Flatseal.
All that's needed is to create a new Bottle, then add CLIFp.exe and add the necessary arguments (play -i [ID]).

This also enables you to use bottles-cli. The command (when Bottles is installed as a Flatpak) goes like this:
flatpak run --command=bottles-cli com.usebottles.bottles run -b [BOTTLE_NAME] -e "/path/to/Flashpoint/CLIFp.exe" 'play -i [ID]'
Replace [BOTTLE_NAME] with the name of the Bottle, /path/to/Flashpoint with the path to your Flashpoint folder, and [ID] with the Flashpoint game ID.
I may provide a video guide of my own for the future, but for now this will be it.
1440
1441
1442
1443
1444
[This was posted by me initially to [!steamdeck@lemmy.ml](/c/steamdeck@lemmy.ml). By request, it is reposted here.]
So far, the information available on the Steam Deck screws has been sparse, while many people attempting to modify or maintain the Steam Deck noted their fragile nature. So during my recent opening of the Steam Deck, I decided to collect some technical information on screws that are otherwise not written down anywhere.
Types of Screws and their Propensity of Stripping
Most of the screws used in the Steam Deck have been noted as M1.6 (metric with a diameter of 1.6 mm), though below, I will be precise that these may not apply everywhere. There are two types of screws involved, machine screws (metal-to-metal contact) and plastic self-tapping (metal-to-plastic).
M1.6 machine screws will have a rigidly standardized pitch of 0.35 mm (ISO 7045:2011), often written in short as M1.6-0.35. The M1.6 self-tapping screws seem to have often a pitch of 0.64 mm, which some vendor references as a JIS standard (which I have no visibility into, but see, e.g., https://www.newstarfastenings.com/uploads/Brochure.pdf on page 29), whereas the M1.5 self-tapping pitch of 0.5 mm is defined in ISO 1478:1999.
The back screws are described in the following:
https://gitlab.steamos.cloud/SteamDeck/hardware/-/blob/master/steamdeck_2d_20220202.pdf
Measuring their pitch and lengths shows they are consistent with being:
- M1.6-0.64×8.7mm (9.5 mm total length), pan headed for the longer self-tapper and
- M1.6-0.35×5mm (5.8 mm total length), (thickish) wafer headed for the shorter machine screw.
Note iFixit only lists the total length, whereas you mostly need the thread length, which is the value after the “×” sign, when looking for replacement screws. I am not going into great detail about these, as OEM replacement screws are readily available.
Valve customer support revealed the specification of the two small machine screws at the top and bottom left of the EMI shield to someone inquiring about it (I added the head shape):
- M1.6-0.35×3mm, pan headed
(total length 3.7 mm, https://www.ifixit.com/Answers/View/730764/). I do not recall an official statement on the large EMI shield screw underneath the foil, but in the eXtremeRate front plate kit, there is one screw shared between this and the SSD. Hence this is likely the standard machine screw as with the SSD:
- M2-0.4×2.5mm, wafer headed, head diameter 4.5 mm
Three self-tapping screws of a more mysterious origin attach to each analog stick. There are 28 screws of this type in a Steam Deck. Yet no source seems to have ever named the specification of this screw. And my inquiries with Valve customer support got the response that they do not know (and have no vendor they want to reveal). My measurements suggest
- In between M1.55-0.5×4.5mm and M1.55-0.55×4.5mm (total length 5.2 mm), wafer headed, head height 0.7 mm, head diameter 3.5 mm
These are very custom screws and are virtually impossible to obtain.
The best replacement I found is the ones that come with eXtremeRate front plate kit, which is 0.17-0.64×4.5mm, and a head with the same dimension as the OEM screw. As they have a larger M1.7 size, these screws will hopefully re-tap their threads further into the plastic. Empirically I found them to hold well. And these screws from eXtremeRate have far deeper Phillips slots than the OEM screws, making them significantly more stripping resistant.
Note that while scary (and do not do it unless necessary), in the worst case, there are two methods to fix the tapped or stripped holes: Using epoxy like J-B Weld, see, e.g., over at r/consolerepair (https://www.reddit.com/r/consolerepair/comments/rg3oec/repair_screw_plastic/), or you could also replace the front cover and therefore tapping completely fresh using your favorite screw thread.
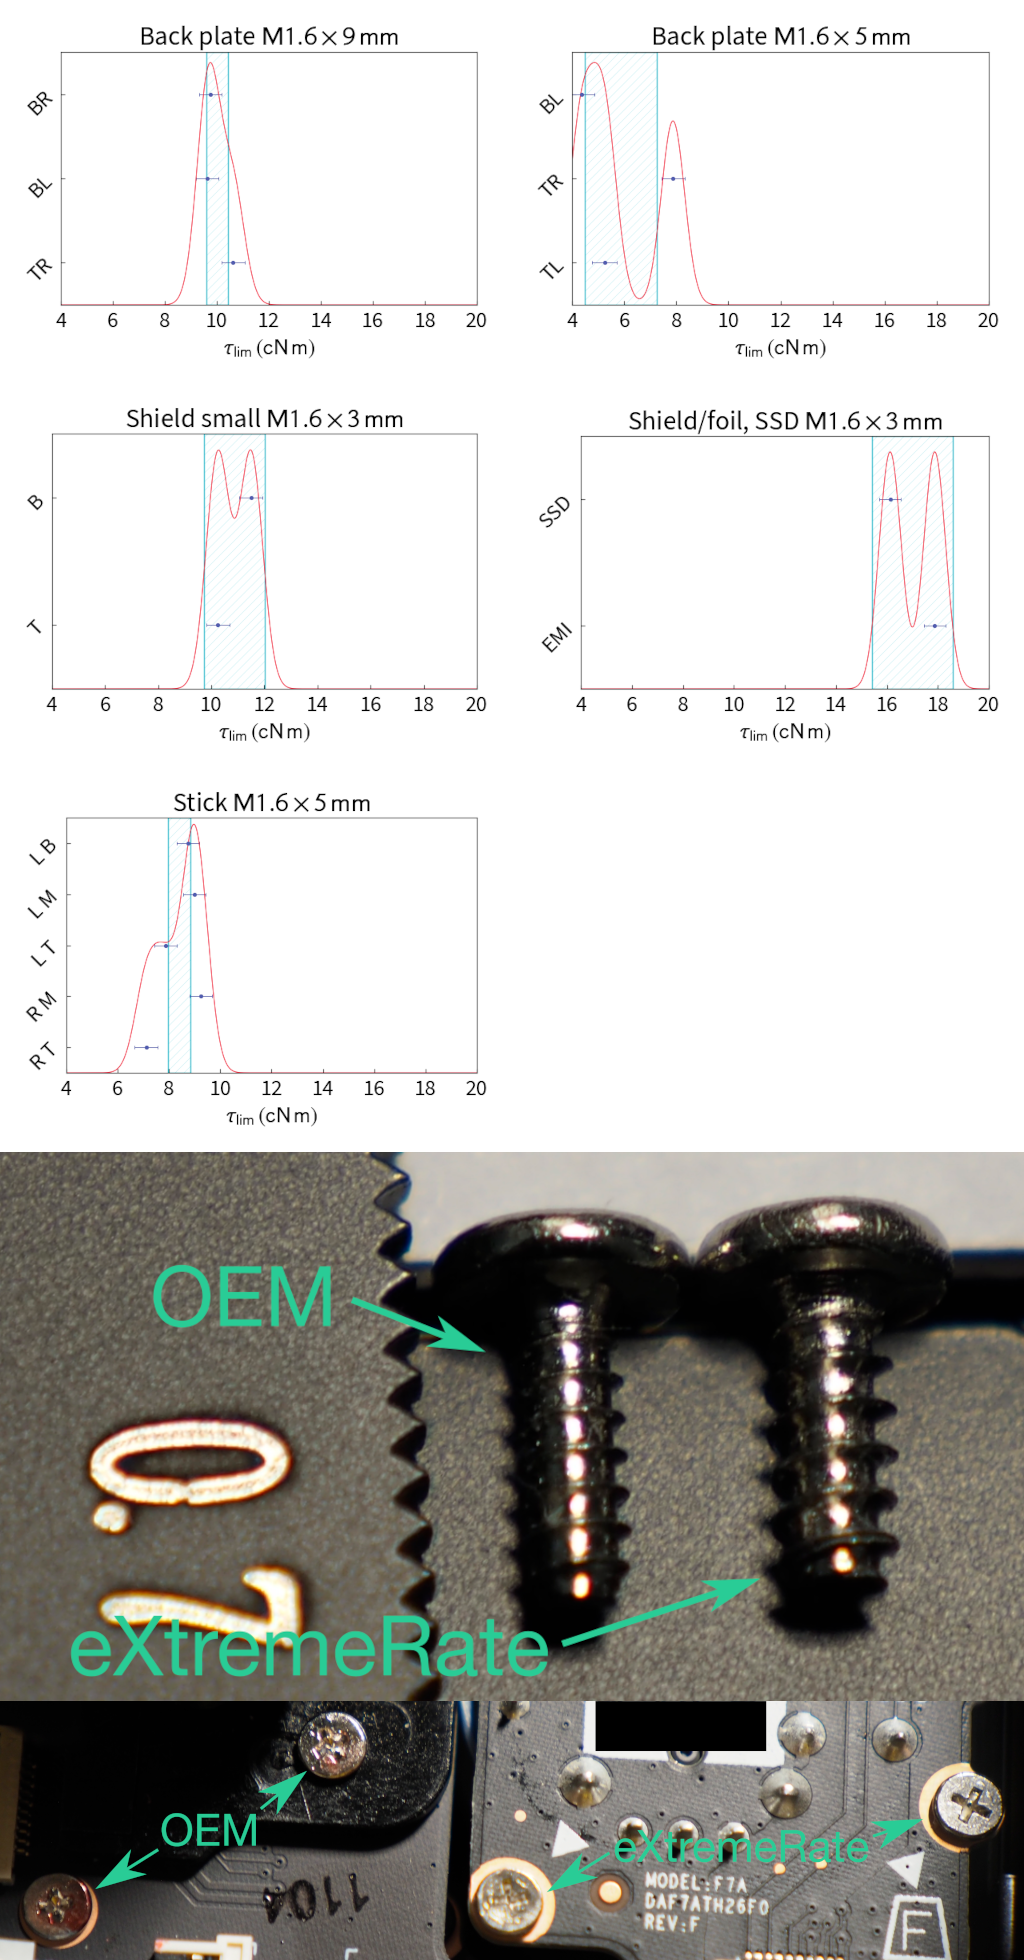
I included figures showing the comparison between the screws and how they compare once inserted.
Appropriate Torque
Laptop manufacturers often supply the design screw torques in their maintenance or field service manuals. Upon my inquiries, neither Valve customer support (who referred to iFixit) nor iFixit could provide the screw torques for the Steam Deck. And self-tapping screws usually have empirical torques determined using failure analysis (screw until the plastic breaks) that only the manufacturer/ODM would know.
Therefore I applied the torque auditing method by loosening on a pristine (never opened) Steam Deck to independently determine the screw torques during the assembly process in the factory. These are as follows:
- Back M1.6×9mm: 10 cN·m (14 ozf·in)
- Back M1.6×5mm: 8 cN·m (11 ozf·in) — the initial loosening torques were a bit ambiguous, and this was rechecked by re-tightening and reproducing the loosening torques
- Shield small: 10 cN·m (14 ozf·in)
- Shield/foil and SSD: 16 cN·m (23 ozf·in)
- Stick: 6 cN·m (8 ozf·in) if reusing the OEM screws, or 10–14 cN·m (14–20 ozf·in) when re-tapping with M1.7
The OEM stick screws are fragile and tend to strip with a slightly misaligned screwdriver above a torque τ = 10 cN·m. Hence the recommendation is to stick to 6 cN·m if the screw is reused. Also, these screws appear to have QA markings with red Loctite, which can artificially increase the loosening torque to around 10 cN·m. This low threshold further explains why many people ended up stripping these screws.
During my re-tapping with M1.7 screws, 5 out of the 6 stick screws could be re-tapped with τ = 10 cN·m, and the last one required 14 cN·m. Both values indicate that a healthy amount of friction is retained, not indicative of the tapped grooves being stripped.
Note on the Appropriate Phillips Bit
Annoyingly, iFixit would not provide any concrete advice on bit sizes. Instead, it says, “Phillips screwdrivers can vary in size and shape,” which is true. However, it is quite possible to check bits for the correct size.
The Phillips/cross recess H is defined in ISO 4757:1983 Section 2.1. Among the parameters in Table 1, the recess width f is the easiest to check for small bits. The correct bit should be ISO No. 0, sometimes denoted “PH0.” In the ISO standard, No. 0 has f = 0.31–0.36 mm, and, e.g., when I checked, the Wiha Slotted Torque Control Blade PH0 measures 0.35 mm.
A free copy of ISO 4757:1983 is e.g., in https://law.resource.org/pub/in/bis/S01/is.7478.2011.pdf
Note on Torque Auditing and Uncertainties
When using the loosening method, the conventionally used estimate for the ratio of measured torque/tightening torque = 0.6–0.9, with a mean = 0.8. For simplicity, 0.8 is used, with a ± 20% uncertainty relative. See, e.g., explained by Tohnichi:
https://www.tohnichi.com/pdf/03-inspecting-tightening-torque.pdf
Additionally, the Tohnichi dial torque meter has a manufacturer-specified uncertainty of ± 3% relative. This meter was cross-calibrated against the Wiha TorqueVario-S 4–46 cN·m driver, which has a manufacturer-specified uncertainty of ± 10% relative. Cross-calibrating both devices yielded an additional possible uncertainty source of ± (0.8 cN·m) / τ relative (τ being the torque), which can be from the indicator needle’s inertia and finite scale reading resolution.
The plots in the figure show the estimated tightening torque with uncertainties as error bars, their joint distribution assuming Gaussians as the curve, and the 68% Student’s t confidence interval of the tightening torque as a shaded area.
Raw Torque Measurements
Units in cN·m, annotated by screw length.
Back top (left to right)
- 9.5mm
4.2 5.8mm
6.3 5.8mm
8.5 9.5mm

Back bottom (left to right)
7.7 9.5mm
3.5 5.8mm
- 5.8mm
7.8 9.5mm

Shield (top to bottom)
8.2 3.7mm
14.3 3.4mm
9.7 3.7mm

SSD
12.9 3.4mm

Stick R (top to bottom)
5.7
7.4
- (10.8 but Loctite)

Stick L (top to bottom)
6.3
7.2
7.0

Trigger bracket R (top to bottom)
8.6
-
8.3
1445
1446
1447
1448
1449
1450