Hackaday

880 readers
6 users here now

Fresh hacks every day

founded 1 year ago
MODERATORS
101


This week Jonathan chats with benny Vasquez about AlmaLinux! Why is AlmaLinux the choice for slightly older hardware? What is the deal with RISC-V? And how does EPEL fit in? Tune in to find out!

https://www.linkedin.com/in/bennyvasquez/almalinux.orghttps://almalinux.org/blog/2025-04-24-election-announcement/https://almalinux.org/blog/2025-06-26-epel-v2-now-covers-almalinux-10-stable/

Did you know you can watch the live recording of the show right on our YouTube Channel? Have someone you’d like us to interview? Let us know, or contact the guest and have them contact us! Take a look at the schedule here.

Direct Download in DRM-free MP3.

If you’d rather read along, here’s the transcript for this week’s episode.

Places to follow the FLOSS Weekly Podcast:

SpotifyRSS

Theme music: “Newer Wave” Kevin MacLeod (incompetech.com)

Licensed under Creative Commons: By Attribution 4.0 License


From Blog – Hackaday via this RSS feed

102


There are all manner of musical myths, covering tones and melodies that have effects ranging from the profound to the supernatural. The Pied Piper, for example, or the infamous “brown note.”

But what about a song that could crash your laptop just by playing it? Even better, a song that could crash nearby laptops in the vicinity, too? It’s not magic, and it’s not a trick—it was just a punchy pop song that Janet Jackson wrote back in 1989.

Rhythm Nation

As told by Microsoft’s Raymond Chen, the story begins in the early 2000s during the Windows XP era. Engineers at a certain OEM laptop manufacturer noticed something peculiar. Playing Janet Jackson’s song Rhythm Nation through laptop speakers would cause the machines to crash. Even more bizarrely, the song could crash nearby laptops that weren’t even playing the track themselves, and the effect was noted across laptops of multiple manufacturers.

Rhythm Nation was a popular song from Jackson’s catalog, but nothing about it immediately stands out as a laptop killer.

After extensive testing and process of elimination, the culprit was identified as the audio frequencies within the song itself. It came down to the hardware of the early 2000s laptops in question. These machines relied on good old mechanical hard drives. Specifically, they used 2.5-inch 5,400 RPM drives with spinning platters, magnetic heads, and actuator arms.

The story revolves around 5,400 RPM laptop hard drives, but the manufacturer and model are not public knowledge. No reports have been made of desktop PCs or hard disks suffering the same issue. Credit: Raimond Spekking, CC BY-SA 4.0

Unlike today’s solid-state drives, these components were particularly susceptible to physical vibration. Investigation determined that something in Rhythm Nation was hitting a resonant frequency of some component of the drive. When this occurred, the drive would be disturbed enough that read errors would stack up to the point where it would trigger a crash in the operating system. The problem wasn’t bad enough to crash the actual hard drive head into the platters themselves, which would have created major data loss. It was just bad enough to disrupt the hard drive’s ability to read properly, to the point where it could trigger a crash in the operating system.

A research paper published in 2018 investigated the vibrational characteristics of a certain model of 2.5-inch laptop hard drive. It’s not conclusive evidence, and has nothing to do with the Janet Jackson case, but it provides some potentially interesting insights as to why similar hard drives failed to read when the song was played. Credit: Research paper

There was a simple workaround for this problem, that was either ingenious or egregious depending on your point of view. Allegedly, the OEM simply whipped up a notch filter for the audio subsystem to remove the offending frequencies. The filter apparently remained in place from the then-contemporary Windows XP up until at least Windows 7. At this point, Microsoft created a new rule for “Audio Processing Objects” (APO) which included things like the special notch filter. The rule stated that all of these filters must be able to be switched off if so desired by the user. However, the story goes that the manufacturer gained a special exception for some time to leave their filter APO on at all times, to prevent users disabling it and then despairing when their laptops suddenly started crashing unexpectedly during Janet Jackson playlists.

As for what made Rhythm Nation special? YouTuber Adam Neely investigated, and came up with a compelling theory. Having read a research paper on the vibrational behavior of a 2.5-inch 5,400 RPM laptop hard disk, he found that it reported the drive to have its largest vibrational peak at approximately 87.5 Hz.  Meanwhile, he also found that Rhythm Nationhad a great deal of energy at 84.2 Hz. Apparently, the recording had been sped up a touch after the recording process, pushing the usual low E at 82 Hz up slightly higher. The theory being that the mild uptuning in Rhythm Nationpushed parts of the song close enough to the resonant frequency of some of the hard drive’s components to give them a good old shaking, causing the read errors and eventual crashes.

It’s an interesting confluence of unintended consequences. A singular pop song from 1989 ended up crashing laptops over a decade later, leading to the implementation of an obscure and little-known audio filter. The story still has holes—nobody has ever come forward to state officially which OEM was involved, and which precise laptops and hard drives suffered this problem. That stymies hopes for further research and recreation of this peculiarity. Nevertheless, it’s a fun tech tale from the days when computers were ever so slightly more mechanical than they are today.


From Blog – Hackaday via this RSS feed

103


It’s been awhile since we checked in with Canada’s Edison Motors, so let’s visit [DeBoss Garage] for an update video. To recap, Edison Motors is a Canadian company building diesel-electric hybrid semi-trucks and more.

Arial view of Edison's new propertyThe last interesting thing to happen in Donald, BC was when it burned down in the 1910s.

Well, they’ve thankfully moved out of the tent in their parents’ back yard where the prototype was built. They’ve bought themselves a company town: Donald, British Columbia, complete with a totally-not-controversial slogan “Make Donald Great Again”.

More interesting is that their commercial-off-the-shelf (COTS), right-to-repair centered approach isn’t just for semi-trucks: they’re now a certified OEM manufacturer of a rolling heavy truck chassis you can put your truck cab or RV body on, and they have partnered with three coach-builders for RVs and a goodly number of manufacturing partners for truck conversion kits. The kits were always in the plan, but selling the rolling chassis is new.

One amazingly honest take-away from the video is the lack of numbers for the pickups: top speed, shaft horsepower, torque? They know what all that should be, but unlike the typical vaporware startup, Edison won’t tell you the engineering numbers on the pickup truck kits until it has hit the race track and proved itself in the real world. These guys are gear-heads first and engineers second, so for once in a long time the adage “engineers hate mechanics” might not apply to a new vehicle.

The dirt track is the first thing under construction in Donald, so hopefully the next update we hear from Edison Motors will include those hard numbers, including pesky little things like MSRP and delivery dates. Stay tuned.

In our last post about an electric truck, a lot of you in the comments wanted something bigger, heavier duty, not pure battery, and made outside the USA. Well, here it is.

Thanks to [Keith Olson] for the tip. Remember, the lines are always open!


From Blog – Hackaday via this RSS feed

104


With immunotherapy increasingly making it out of the lab and into hospitals as a viable way to treat serious conditions like cancer, there’s a lot of pressure to optimize these therapies. This is especially true for therapies involving chimeric antigen receptor (CAR) T cells, which so far required a cumbersome process of extracting the patient’s T cells, modifying them ex vivo and returning the now CAR T cells to the patient’s body. After a recently published study, it seems that we may see in vivo  CAR T cell therapy become reality, with all the ease of getting a vaccine shot.

We covered CAR T cells previously in the context of a way to prevent T cell exhaustion and making them more effective against certain tumors. This new study (paywalled) by [Theresa L. Hunter] et al. as published in Science demonstrates performing the CAR manipulation in vivo using CD8+ T cell targeting lipid nanoparticles containing mRNA to reprogram these T cells directly.

In rodent and non-human primate studies a clear effect on tumor control was demonstrated, with for auto-immune diseases the related B cells becoming effectively depleted. Although it’s still a long way off from human trials and market approval, this research builds upon the knowledge gained from existing mRNA vaccines, raising hopes that one day auto-immune or cancer therapy could be as simple as getting a cheap, standardized shot.


From Blog – Hackaday via this RSS feed

105


Marauder LowRacer banner

Thanks to [Radical Brad] for writing in to let us know about his recent project, building a street racing bike from square tubing and old bike parts.

In this 50 minute video [Radical Brad] takes us through the process of building the Marauder v2, a street racing LowRacer. The entire build was done over a few weekends using only an AC welder, angle grinder, and basic hand tools you probably have in the garage.

The entire rear section of the Marauder is made from an unmodified stock rear triangle from a typical suspension mountain bike. The frame is made from 1.5″ mild steel square tubing with 1/16″ wall thickness, which is called “16 gauge tubing”.

[Radical Brad] runs you through the process of welding the pieces together at the appropriate angles along with some tips about how to clamp everything in place while you work on it. After completing the rear end he proceeds to the front end which uses the fork from the front of the old bike. A temporary seat is fashioned from some wooden boards joined together with hinges. Then the steering system is installed. Then the chains and pulleys for the motion system. Then the seat is finalized, and after a coat of paint, and installing some brakes, we’re done!

If you’re interested in projects for old bike parts you might like to check out Juice-Spewing Wind Turbine Bootstrapped From Bike Parts and Odd-Looking Mini EV Yard Tractor Is Made From Plywood And Bike Parts.


From Blog – Hackaday via this RSS feed

106


Certain styles of photography or videography immediately evoke an era. Black-and-white movies of flappers in bob cuts put us right in the roaring 20s, while a soft-focused, pastel heavy image with men in suits with narrow ties immediately ties us to the 60s. Similarly, a film shot at home with a Super 8 camera, with its coarse grain, punchy colors, and low resolution brings up immediate nostalgia from the 80s. These cameras are not at all uncommon in the modern era, but the cartridges themselves are definitely a bottleneck. [Nico Rahardian Tangara] retrofitted one with some modern technology that still preserves that 80s look.

The camera he’s using here is a Canon 514XL-S that was purchased for only $5, which is a very common price point for these obsolete machines, especially since this one wasn’t working. He removed all of the internal components except for a few necessary for the camera to work as if it still was using film, like the trigger mechanism to allow the camera to record. In the place of tape he’s installed a Raspberry Pi Zero 2W and a Camera Module 3, so this camera can record in high definition while retaining those qualities that make it look as if it’s filmed on an analog medium four decades ago.

[Nico] reports that the camera does faithfully recreate this early era of home video, and we’d agree as well. He’s been using it to document his own family in the present day, but the results he’s getting immediately recall Super 8 home movies from the 80s and early 90s. Raspberry Pis are almost purpose-built for the task of bringing older camera technology into the modern era, and they’re not just limited to video cameras either. This project put one into an SLR camera from a similar era.


From Blog – Hackaday via this RSS feed

107


Who knows what you’ll find in a second-hand shop? [Zeal] found some old keyboards made to fit early Alcatel phones from the year 2000 or so. They looked good but, of course, had no documentation. He’s made two videos about his adventure, and you can see them below.

The connector was a cellphone-style phone jack that must carry power and some sort of serial data. Inside, there wasn’t much other than a major chip and a membrane keyboard. There were a few small support chips and components, too.

This is a natural job for a logic analyzer. Sure enough, pressing a key showed some output on the logic analyzer. The device only outputs data, and so, in part 2, [Zeal] adds it to his single-board Z-80 computer.

It makes a cute package, but it did take some level shifting to get the 5V logic to play nice with the lower-voltage keyboard. He used a processor to provide protocol translation, although it looks like you could have easily handled the whole thing in the host computer software if you had wanted to do so.

Truthfully, there isn’t much chance you are going to find this exact keyboard. However, the process of opening a strange device and reverse engineering what it is all about is classic.

Don’t have a logic analyzer? A scope might have been usable for this, but you can also build one for very little these days. Using a PS/2 keyboard isn’t really easier, by the way, it is just well-documented.


From Blog – Hackaday via this RSS feed

108


What if you electroplated a plastic 3D print, and then melted off the plastic to leave just the metal behind? [HEN3DRIK] has been experimenting with just such a process, with some impressive results.

For this work, [HEN3DRIK] prints objects in a special PVB “casting filament” which has some useful properties. It can be smoothed with isopropanol, and it’s also intended to be burnt off when used in casting processes. Once the prints come off the printer, [HEN3DRIK] runs a vapor polishing process to improve the surface finish, and then coats the print with copper paint to make the plastic conductive on the surface. From there, the parts are electroplated with copper to create a shiny metallic surface approximately 240 micrometers thick. The final step was to blowtorch out the casting filament to leave behind just a metal shell. The only problem is that all the fire tends to leave an ugly oxide layer on the copper parts, so there’s some finishing work to be done to get them looking shiny again.

We’ve featured [HEN3DRIK]’s work before, particularly involving his creation of electroplated 3D prints with mirror finishes. That might be a great place to start your research if you’re interested in this new work. Video after the break.


From Blog – Hackaday via this RSS feed

109


In Greek mythology, Sisyphus was a figure who was doomed to roll a boulder for eternity as a punishment from the gods. Inspired by this, [Aidan], [Jorge], and [Henry] decided to build a sand-drawing table that endlessly traces out beautiful patterns (or at least, for as long as power is applied). You can watch it go in the video below.

The project was undertaken as part of the trio’s work for the ECE4760 class at Cornell. A Raspberry Pi Pico runs the show, using TMC2209 drivers to command a pair of NEMA17 stepper motors to drag a magnet around beneath the sand. The build is based around a polar coordinate system, with one stepper motor rotating an arm under the table, and another panning the magnet back and forth along its length. This setup is well-suited to the round sand pit on top of the table, made with a laser-cut wooden ring affixed to a thick base plate.

The trio does a great job explaining the hardware and software decisions made, as well as showing off how everything works in great detail. If you desire to build a sand table of your own, you would do well to start here. Or, you could explore some of the many other sand table projects we’ve featured over the years.


From Blog – Hackaday via this RSS feed

110


If there’s one thing that characterizes the Information Age that we find ourselves in today, it is streams of data. However, without proper ways to aggregate and transform this data into information, it’ll either vanish into the ether or become binary blobs gathering virtual dust on a storage device somewhere. Dealing with these streams of data is thus essential, whether it’s in business (e.g. stock markets), IT (e.g. services status), weather forecasting, or simply keeping tracking of the climate and status of devices inside a domicile.

The first step of aggregating data seems simple, but rather than just writing it to a storage device until it runs out of space like a poorly managed system log, the goal here isn’t merely to record, but also to make it searchable. After all, for information transformation we need to be able to efficiently search and annotate this data, which requires keeping track of context and using data structures that lend themselves to this.

For such data aggregation and subsequent visualization of information on flashy dashboards that people like to flaunt, there are a few mainstream options, with among ‘smart home’ users options like InfluxDB and Grafana often popping up, but these are far from the only options, and depending on the environment there are much more relevant solutions.

Don’t Call It Data Hoarding

Although the pretty graphs and other visualizations get most of the attention, the hard part comes with managing the incoming data streams and making sure that the potentially gigabytes of data that come in every day (or more, if you work at CERN), are filed away in a way that makes retrieval as easy as possible. At its core this means some kind of database system, where the data can be transformed into information by stuffing it into the appropriate table cells or whatever equivalent is used.

For things like sensor data where the data format tends to be rather simple (timestamp and value), a time series database (TSD) can be an efficient option as the full feature set of e.g. a full-fat SQL database like MySQL/MariaDB or PostgreSQL is unneeded. There are also a lot of open source options out there, making TSD users spoiled for choice. For example:

InfluxDB – Partially open source, with version 3 being less of a successor and more of its own ‘edge data collector’ thing. Somewhat controversial due to the company’s strong commercial focus.Apache Kudu – Column-based database optimized for multidimensional OLAP workloads. Part of the Apache Hadoop distributed computing ecosystem.Prometheus – Developed at SoundCloud to support metrics monitoring. Also written in Go like InfluxDB v1 and v2.RRDTool – An all-in-one package that provides a circular buffer TSD that also does graphing and has a number of bindings for various programming languages.Graphite – Similar to RRDTool, but uses a Django web-based application to render graphs.TimescaleDB – Extends PostgreSQL and thus supports all typical SQL queries like any other relational database. The extensions focus on TSD functionality and related optimizations.

The internal implementations of these databases differ, with InfluxDB’s storage engine splitting the data up in so-called shards, which can be non-compacted ‘hot’ shards, or compacted ‘cold’ shards. The main purpose of this is to reduce the disk space required, with four compaction levels (including delta compression) used while still retaining easy access to specific time series using a time series index. The shard retention time can be optionally set within the database (‘bucket’) to automatically delete older shards.

A circular buffer as used by RRDTool dodges much of this storage problem by simply limiting how much data can be stored. If you do not care about historical data, or are happy to have another application do this long-term storage, then such a more simple TSD can be a lightweight alternative.

Pretty Graphs

Grafana dashboard for the BMaC system.Grafana dashboard for the BMaC system.

While some of the TSDs come with their own graphing system, others rely on third-party solutions. The purpose of this graphing step is to take the raw data in the TSD and put them into a graph, a table or some other kind of visualization. When multiple of such visualizations are displayed concurrently and continuously, it’s called a ‘dashboard’, which is what software like Grafana allows you to create.

As an example of such a system, there is the Building Management and Control (BMaC) project that I created a few years ago. In addition to being able to control things like the airconditioning, the data from multiple sensors constantly get written into an InfluxDB bucket, which in the office test environment included such essentials like the number of cups of regular coffee and espresso consumed at the Jura coffee makers with their TOP-tronics brains, since this could be read out of their Flash memory.

With this visualization dashboard it’s easy to keep track of room temperature, air quality (CO2) and when to refill the beans in the coffee machines. Transforming raw data into such a dashboard is of course just one way to interpret raw data, with generating one-off graphs for e.g. inclusion in reports being another one. Which type of transformation is the right one thus depends on your needs.

In a more dynamic environment like system monitoring, you would likely prefer something like Nagios. This features clients that run on the systems being monitored and submit status and event reports, with a heavy focus on detecting problems within e.g. a server farm as soon as possible.

Complications

Everyone who has ever done anything with software knows that the glossy marketing flyers omit a lot of the factual reality. So too with TSDs and data visualization software. During the years of using Grafana and InfluxDB mostly in the context of the BMaC project, one of the most annoying things was the installation, which for Grafana means either downloading a package or using their special repository. Meanwhile for InfluxDB you will use their special repository no matter what, while on Windows you get the raw binaries and get to set things up by hand from there.

Another annoyance with InfluxDB comes in the form of its lack of MQTT support, with only its HTTP line protocol and its SQL-dialect available as ways to insert new time series data. For BMaC I had to write a special MQTT-to-HTTP bridge to perform the translation here. Having a TSD that directly supports the data protocol and format would be a real bonus, if it is available for your use case.

Overall, running a TSD with a dashboard can be very shiny, but it can be a serious time commitment to set up and maintain. For dashboards you’re also basically limited to Grafana with all its quirks, as the project it was forked from (Kibana) only supports ElasticSearch as data source, while Grafana supports multiple TSDs and even plain SQL databases like MariaDB and PostgreSQL.

It’s also possible to create a (free) online account with Grafana to gain access to a Prometheus TSD and Grafana dashboard, but this comes with the usual privacy concerns and the need to be online 24/7. Ultimately the key is to have a clear idea beforehand of what the problem is that you’re trying to solve with a TSD and a graphing solution or dashboard.


From Blog – Hackaday via this RSS feed

111


The Raspberry Pi has been used for many things over its lifetime, and we’re guessing that many of you will have one in perhaps its most common configuration, as a small server. [Thibault] has a Pi 4 in this role, and it’s used to back up the data from his VPS in a data centre. The Pi 4 may be small and relatively affordable, but it’s no slouch in computing terms, so he was extremely surprised to see it showing a transfer speed in bytes per second rather than kilobytes or megabytes. What was up? He set out to find the bottleneck.

We’re treated to a methodical step-through of all the constituent parts of the infrastructure between the data centre and the disk, and all of them show the speeds expected. Eventually, the focus shifts to the encryption he’s using, both on the USB disk connected to the Pi and within the backup program he’s using. As it turns out, while the Pi is good at many things, encryption is not its strong point. Some work with htop shows the cores maxed out as it tries to work with encrypted data, and he’s found the bottleneck.

To show just how useful a Pi server can be without the encryption, we’re using an early model to crunch a massive language corpus.

Header image: macrophile, CC BY 2.0.


From Blog – Hackaday via this RSS feed

112


Some Mondays are worse than others, but April 28 2025 was particularly bad for millions of people in Spain and Portugal. Starting just after noon, a number of significant grid oscillations occurred which would worsen over the course of minutes until both countries were plunged into a blackout. After a first substation tripped, in the span of only a few tens of seconds the effects cascaded across the Iberian peninsula as generators, substations, and transmission lines tripped and went offline. Only after the HVDC and AC transmission lines at the Spain-France border tripped did the cascade stop, but it had left practically the entirety of the peninsula without a functioning power grid. The event is estimated to have been the biggest blackout in Europe ever.

Following the blackout, grid operators in the affected regions scrambled to restore power, while the populace tried to make the best of being plummeted suddenly into a pre-electricity era. Yet even as power gradually came back online over the course of about ten hours, the question of what could cause such a complete grid collapse and whether it might happen again remained.

With recently a number of official investigation reports having been published, we have now finally some insight in how a big chunk of the European electrical grid suddenly tipped over.

Oscillations

Electrical grids are a rather marvelous system, with many generators cooperating across thousands of kilometers of transmission lines to feed potentially millions of consumers, generating just enough energy to meet the amount demanded without generating any more. Because physical generators turn more slowly when they are under heavier load, the frequency of the AC waveform has been the primary coordination mechanism across power plants. When a plant sees a lower grid frequency, it is fueled up to produce more power, and vice-versa. When the system works well, the frequency slowly corrects as more production comes online.

The greatest enemy of such an interconnected grid is an unstable frequency. When the frequency changes too quickly, plants can’t respond in time, and when it oscillates wildly, the maximum and minumum values can exceed thresholds that shut down or disconnect parts of the power grid.

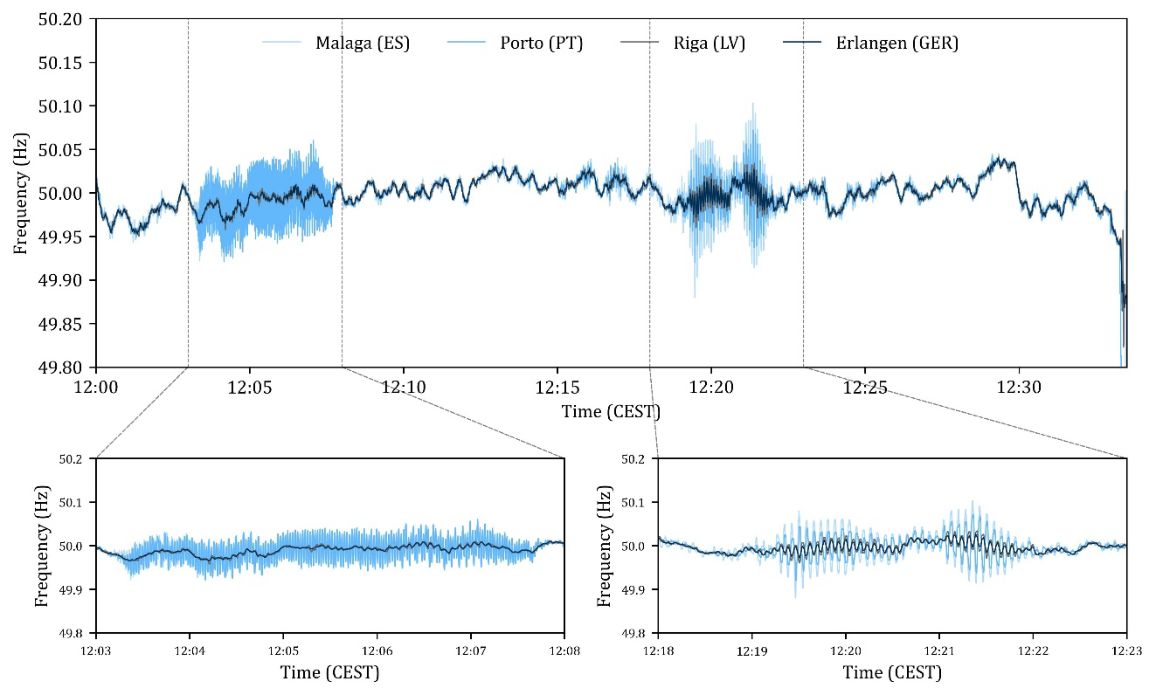
In the case of the Iberian blackout, a number of very significant oscillations were observed in the Spanish and Portuguese grids that managed to also be observable across the entire European grid, as noted in an early analysis (PDF) by researchers at Germany’s Friedrich-Alexander-Universität (FAU).

European-wide grid oscillations prior to the Iberian peninsula blackout. (Credit: Linnert et al., FAU, 2025)European-wide grid oscillations prior to the Iberian peninsula blackout. (Credit: Linnert et al., FAU, 2025)

This is further detailed in the June 18th report (direct PDF link) by Spain’s Transmission System Operator (TSO) Red Eléctrica (REE). Much of that morning the grid was plagued by frequency oscillations, with voltage increases occurring in the process of damping said oscillations. None of this was out of the ordinary until a series of notable events, with the first occurring after 12:02 with an 0.6 Hz oscillation repeatedly forced by a photovoltaic (PV) solar plant in the province of Badajoz which was feeding in 250 MW at the time. After stabilizing this PV plant the oscillation ceased, but this was followed by the second event with an 0.2 Hz oscillation.

After this new oscillation was addressed through a couple of measures, the grid was suffering from low-voltage conditions caused by the oscillations, making it quite vulnerable. It was at this time that the third major event occurred just after 12:32, when a substation in Granada tripped. The speculation by REE being that its transformer tap settings had been incorrectly set, possibly due to the rapidly changing grid conditions outpacing its ability to adjust.

Subsequently more substations, solar- and wind farms began to go offline, mostly due to a loss of reactive power absorption causing power flow issues, as the cascade failure outpaced any isolation attempts and conventional generators also threw in the towel.

Reactive Power

Grid oscillations are a common manifestation in any power grid, but they are normally damped either with no or only minimal interaction required. As also noted in the earlier referenced REE report, a big issue with the addition of solar generators on the grid is that these use grid-following inverters. Unlike spinning generators that have intrinsic physical inertia, solar inverters can rapidly follow the grid voltage and thus do not dampen grid oscillations or absorb reactive power.  Because they can turn on and off essentially instantaneously, these inverters can amplify oscillations and power fluctuations across the grid by boosting or injecting oscillations if the plants over-correct.

In alternating current (AC) power systems, there are a number of distinct ways to describe power flow, including real power (Watt), complex power (VA) and reactive power (var). To keep a grid stable, all of these have to be taken into account, with the reactive power management being essential for overall stability. With the majority of power at the time of the blackout being generated by PV solar farms without reactive power management, the grid fluctuations spun out of control.

Generally, capacitors are considered to create reactive power, while inductors absorb it. This is why transformer-like shunt reactors – a parallel switchyard reactor – are an integral part of any modern power grid, as are the alternators at conventional power plants which also absorb reactive power through their inertia. With insufficient reactive power absorption capacity, damping grid oscillations becomes much harder and increases the chance of a blackout.

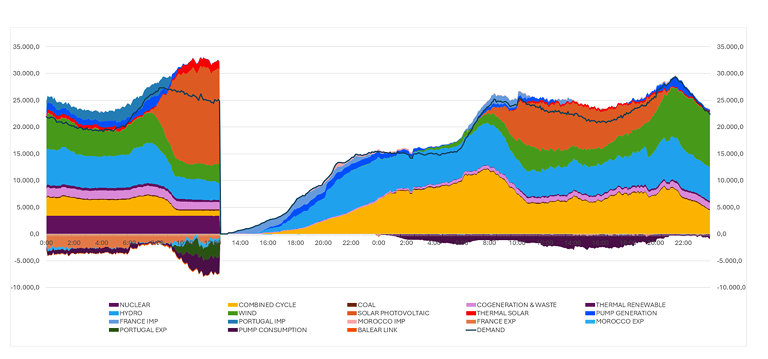
Ultimately the cascade failure took the form of an increasing number of generators tripping, which raised the system voltage and dropped the frequency, consequently causing further generators and transmission capacity to trip, ad nauseam. Ultimately REE puts much of the blame at the lack of reactive power which could have prevented the destabilization of the grid, along with failures in voltage control. On this Monday PV solar in particular generated the brunt of grid power in Spain at nearly 60%.

Generating mix in Spain around the time of the blackout. (Credit: ENTSOE)Generating mix in Spain around the time of the blackout. (Credit: ENTSO-E)

Not The First Time

Despite the impression one might get, this wasn’t the first time that grid oscillations have resulted in a blackout. Both of the 1996 Western North America blackouts involved grid oscillations and a lack of reactive power absorption, and the need to dampen grid oscillations remains one of the highest priorities. This is also where much of the criticism directed towards the current Spanish grid comes from, as the amount of reactive power absorption in the system has been steadily dropping with the introduction of more variable renewable energy (VRE) generators that lack such grid-stabilizing features.

To compensate for this, wind and solar farms would have to switch to grid-forming inverters (GFCs) – as recommended by the ENTSO-E in a 2020 report – which would come with the negative effect of making VREs significantly less economically viable. Part of this is due to GFCs still being fairly new, while there is likely a strong need for grid-level storage to be added to any GFC in order to make especially Class 3 fully autonomous GFCs work.

It is telling that five years after the publication of this ENTSO-E report not much has changed, and GFCs have not yet made inroads as a necessity for stable grid operation. Although the ENTSO-E’s own investigation is still in progress with a final report not expected for a few more months at least, in light of the available information and expert reports, it would seem that we have a good idea of what caused the recent blackout.

The pertinent question is thus more likely to be what will be done about it. As Spain and Portugal move toward a power mix that relies more and more heavily on solar generation, it’s clear that these generators will need to pick up the slack in grid forming. The engineering solution is known, but it is expensive to retrofit inverters, and it’s possible that this problem will keep getting kicked down the road. Even if all of the reports are unanimous in their conclusion as to the cause, there are unfortunately strong existing incentives to push the responsibility of avoiding another blackout onto the transmission system operators, and rollout of modern grid-forming inverters in the solar industry will simply take time.

In other words, better get used to more blackouts and surviving a day or longer without power.


From Blog – Hackaday via this RSS feed

113


In the 1980s, there was a truly staggering amount of choice for a consumer looking to purchase a home computer. On the high end, something like an Apple Lisa, a business-class IBM PC, or a workstation from Sun Microsystems could easily range from $6,000 to $20,000 (not adjusted for inflation). For the time, these mind-blowing prices might have been worth the cost, but for those not willing to mortgage their homes for their computing needs, there were also some entry-level options. One of these was the Sinclair ZX-80, which was priced at an astounding $100, which caused RadioShack to have a bit of a panic and release this version of the TRS-80 computer to compete with it.

As [David] explains in his deep dive into this somewhat obscure machine, the TRS-80 MC-10 was a commercial failure, although not for want of features. It had a color display, a chicklet keyboard, and 4K of RAM, which were all things that the ZX-80 lacked.

Unfortunately, it also had a number of drawbacks compared to some of its other contemporaries that made consumers turn away. Other offerings by Commodore, Atari, Texas Instruments, and even RadioShack themselves were only marginally more expensive and had many more features, including larger memory and better storage and peripheral options, so most people chose these options instead.

The TRS-80 MC-10 is largely a relic of the saturated 80s home computer market. It’s drop in price to below $50, and the price competition between other PC manufacturers at the time was part of the reason for the video game crash of the 1980s, and even led to Steve Jobs getting fired from Apple. There’s not a huge retro scene for these machines either (although there’s at least one game developer you can see in the video below from [Spriteworx]). If you want to experiment with some of the standard TRS-80 software, there are emulators that have everything you need.

Thanks to [Stephen] for the tip!


From Blog – Hackaday via this RSS feed

114


A clear acrylic cylinder is shown, inside of which plants are visible. There is mist inside the tube, and LEDs light it from above. A black plastic cap to the tube is visible.

For those of us who aren’t blessed with a green thumb and who are perhaps a bit forgetful, plants can be surprisingly difficult to keep alive. In those cases, some kind of automation, such as [Justin Buchanan]’s Oasis smart terrarium, is a good way to keep our plants from suffering too much.

The Oasis has an ultrasonic mister to water the plants from a built-in tank, LED grow lights, fans to control airflow, and a temperature and humidity sensor. It connects to the local WiFi network and can set up recurring watering and lighting schedules based on network time. Most of the terrarium is 3D-printed, with a section of acrylic tubing providing the clear walls. Before installing the electronics, it’s a good idea to waterproof the printed parts with low-viscosity epoxy, particularly since the water tank is located at the top of the terrarium, where a leak would drip directly onto the control electronics.

An ESP32-C3 controls the terrarium; it uses a MOSFET circuit to drive the ultrasonic mister, an SHT30 sensor to measure humidity and temperature, and a PWM driver circuit to control the LEDs. Conveniently, [Justin] also wrote a piece of command-line client software that can find online terrariums on the local network, configure WiFi, set the terrarium’s schedule, control its hardware, and retrieve data from its sensors. Besides this, Oasis also exposes a web interface that performs the same functions as the command-line client.

This isn’t the first automated terrarium we’ve seen, though it is the most aesthetically refined. They aren’t just for plants, either; we’ve seen a system to keep geckos comfortable.


From Blog – Hackaday via this RSS feed

115


People have been talking about switching from Windows to Linux since the 1990s, but in the world of open-source operating systems, there is much more variety than just the hundreds of flavors of Linux-based operating systems today. Take FreeBSD, for example. In a recent [GNULectures] video, we get to see a user’s attempt to switch from desktop Linux to desktop FreeBSD.

The interesting thing here is that both are similar and yet very different, mainly owing to their very different histories, with FreeBSD being a direct derivative of the original UNIX and its BSD derivative. One of the most significant differences is probably that Linux is just a kernel, with (usually) the GNU/Hurd userland glued on top of it to create GNU/Linux. GNU and BSD userland are similar, and yet different, with varying levels of POSIX support. This effectively means that FreeBSD is a singular OS with rather nice documentation (the FreeBSD handbook).

The basic summary here is that FreeBSD is rather impressive and easy to set up for a desktop, especially if you use a customized version like GhostBSD. Despite Libreboot, laptop power management, OSB NVENC, printer, and WiFi issues, it was noted that none of these are uncommon with GNU/Linux either. Having a single package manager (pkg) for all of FreeBSD (and derivatives) simplifies things a lot. The bhyve hypervisor makes running VMs a snap. A robust ZFS filesystem is also a big plus.

What counts against desktop FreeBSD in the end is a less refined experience in some areas, despite FreeBSD being able to run Linux applications courtesy of binary compatibility. With some developer love and care, FreeBSD might make for a nice desktop alternative to GNU/Linux before long, one that could be tempting even for the die-hard Windows holdouts among us.


From Blog – Hackaday via this RSS feed

116


In the world of information security, much thought goes into ensuring that no information can leave computer networks without expressly being permitted to do so. Conversely, a lot of effort is expended on the part of would-be attackers to break through whatever layers are present. [Halcy] has a way to share data between computers, whether they are networked or not, and it uses ultrasound.

To be fair, this is more of a fun toy than an elite exploit, because it involves a web interface that encodes text as ultrasonic frequency shift keying. Your computer speakers and microphone can handle it, but it’s way above the human hearing range. Testing it here, we were able to send text mostly without errors over a short distance, but at least on this laptop, we wouldn’t call it reliable.

We doubt that many sensitive servers have a sound card and speakers installed where you can overhear them, but by contrast, there are doubtless many laptops containing valuable information, so we could imagine it as a possible attack vector. The code is on the linked page, should you be interested, and if you want more ultrasonic goodness, this definitely isn’t the first time we have touched upon it. While a sound card might be exotic on a server, a hard drive LED isn’t.


From Blog – Hackaday via this RSS feed

117


Hackaday Links Column Banner

In today’s episode of “AI Is Why We Can’t Have Nice Things,” we feature the Hertz Corporation and its new AI-powered rental car damage scanners. Gone are the days when an overworked human in a snappy windbreaker would give your rental return a once-over with the old Mark Ones to make sure you hadn’t messed the car up too badly. Instead, Hertz is fielding up to 100 of these “MRI scanners for cars.” The “damage discovery tool” uses cameras to capture images of the car and compares them to a model that’s apparently been trained on nothing but showroom cars. Redditors who’ve had the displeasure of being subjected to this thing report being charged egregiously high damage fees for non-existent damage. To add insult to injury, if renters want to appeal those charges, they have to argue with a chatbot first, one that offers no path to speaking with a human. While this is likely to be quite a tidy profit center for Hertz, their customers still have a vote here, and backlash will likely lead the company to adjust the model to be a bit more lenient, if not outright scrapping the system.

Have you ever picked up a flashlight and tried to shine it through your hand? You probably have; it’s just a thing you do, like the “double tap” every time you pick up a power drill. We’ve yet to find a flashlight bright enough to sufficiently outline the bones in our palm, although we’ve had some luck looking through the flesh of our fingers. While that’s pretty cool, it’s quite a bit different from shining a light directly through a human head, which was recently accomplished for the first time at the University of Glasgow. The researchers blasted a powerful pulsed laser against the skull of a volunteer with “fair skin and no hair” and managed to pick up a few photons on the other side, despite an attenuation factor of about 1018. We haven’t read the paper yet, so it’s unclear if the researchers controlled for the possibility of the flesh on the volunteer’s skull acting like a light pipe and conducting the light around the skull rather than through it, but if the laser did indeed penetrate the skull and everything within it, it’s pretty cool. Why would you do this, especially when we already have powerful light sources that can easily penetrate the skull and create exquisitely detailed images of the internal structures? Why the hell wouldn’t you?!

TIG welding aluminum is a tough process to master, and just getting to the point where you’ve got a weld you’re not too embarrassed of would be so much easier if you could just watch someone who knows what they’re doing. That’s a tall order, though, as the work area is literally a tiny pool of molten metal no more than a centimeter in diameter that’s bathed in an ultra-bright arc that’s throwing off cornea-destroying UV light. Luckily, Aaron over at 6061.com on YouTube has a fantastic new video featuring up-close and personal shots of him welding up some aluminum coupons. He captured them with a Helios high-speed welding camera, and the detail is fantastic. You can watch the weld pool forming and see the cleaning action of the AC waveform clearly. The shots make it clear exactly where and when you should dip your filler rod into the pool, the effect of moving the torch smoothly and evenly, and how contaminants can find their way into your welds. The shots make it clear what a dynamic environment the weld pool is, and why it’s so hard to control.

And finally, the title may be provocative, but “The Sensual Wrench” is a must-see video for anyone even remotely interested in tools. It’s from the New Mind channel on YouTube, and it covers the complete history of wrenches. Our biggest surprise was learning how relatively recent an invention the wrench is; it didn’t really make an appearance in anything like its modern form until the 1800s. The video covers everything from the first adjustable wrenches, including the classic “monkey” and “Crescent” patterns, through socket wrenches with all their various elaborations, right through to impact wrenches. Check it out and get you ugga-dugga on.


From Blog – Hackaday via this RSS feed

118


When you hear “PS2” and “Windows 95,” you probably think someone forgot a slash and are talking about peripherals, but no — this hack is very much about the Sony PlayStation 2, the best-selling game console of all time. [MeraByte] walks us through the possibly ridiculous task of installing Windows 95 on the last hardware anyone at Microsoft would ever endorse in a video you can watch below.

Obviously, the MIPS-based Emotion Engine at the heart of the PS2 is not going to be able to handle x86 instructions Win95 is expecting, but that’s all solved by the magic of emulation. [MeraByte] is running a version of Bochs, an x86 emulator that has been built for PS/2 after trying and failing to install Windows (both 3.1 and 95) to an experimental DOSBox build.

As expected, it is not a smooth journey for [MeraByte], but the flailing about and troubleshooting make for entertaining viewing. Once loaded, it works surprisingly well, in that anything works at all. Unfortunately, neither the mouse nor Ultimate Doom 95 worked. We suppose that ultimately means that this hack fails since even Doom can run Doom. The mouse thing is also important, probably.

If you have a PlayStation 2, maybe skip Windows 95 and try running GoLang.If you do have DOOM running on the PlayStation 2, send us a tip. There was never an official release for PS2, but after 26 years, someone must have done it by now.


From Blog – Hackaday via this RSS feed

119


The underside of the scanner is shown. Four power supply units are visible on the lower side, and assorted electronics are visible on the top side. In the middle, two linear tracks adapted from a 3D printer run along the length of the scanner, and several motors can be seen mounted between the rails.

Scanners for loose papers have become so commonplace that almost every printer includes one, but book scanners have remained frustratingly rare for non-librarians and archivists. [Brad Mattson] had some books to scan, but couldn’t find an affordable scanner that met his needs, so he took the obvious hacker solution and built his own.

The scanning process starts when a conveyor belt removes a book from a stack and drops it onto the scanner’s bed. Prods mounted on a rail beneath the bed straighten the book and move it into position for the overhead camera to take a picture of the cover. Next, an arm with a pneumatic gripper opens the cover, and a metal bar comes down to hold it in place.

The page-turning mechanism uses two fans: one fan blows from the side of the book to ruffle the pages and separate them, while the other is mounted on a swiveling arm. This fan blows away from the page, providing a gentle suction that holds the page to the arm as it turns the page over. Finally, a glass plate descends over the book to hold the pages flat, the camera takes a picture, the glass plate retracts, and the scanner moves on to the next page.

It is hard to imagine, but have a look at the video in the post if you really want to see it in action.

All of the hardware, except for the camera, is controlled by an Arduino Giga using a CNC shield; the camera is directly under the control of a host computer. The host computer checks each photo to make sure it’s not scanning a previously-scanned page, and if it finds that it’s scanned the same page three times in a row, it assumes that the book is finished. In this case, it instructs the Arduino to close the book, takes a picture of the back cover, and moves on to the next book. The design and software for the scanner don’t seem to be available yet, but [Brad] plans to give a more detailed video sometime in the future.

We’ve seen a couple of book scanners here in the past. Some, of course, are more useful than others.

Thanks to [Stu Smith] for the tip!


From Blog – Hackaday via this RSS feed

120


Ever since the invention of the microscope, humanity has gained access to the world of the incredibly small. Scientists discovered that creatures never known to exist before are alive in an uncountable number in spaces as small as the head of a pin. But the microscope unlocked some interesting forms of art as well. Not only could people view and photograph small objects with them, but in the mid-nineteenth century, various artists and scientists used them to shrink photographs themselves down into the world of the microscopic. This article goes into depth on how one man from this era invented the art form known as microphotography.

Compared to photomicroscopy, which uses a microscope or other similar optical device to take normal-sized photographs of incredibly small things, microphotography takes the reverse approach of taking pictures of normal-sized things and shrinking them down to small sizes. [John Benjamin Dancer] was the inventor of this method, which used optics to shrink an image to a small size. The pictures were developed onto photosensitive media just like normal-sized photographs. Not only were these unique pieces of art, which developed — no pun intended — into a large fad, but they also had plenty of other uses as well. For example, since the photographs weren’t at all obvious without a microscope, they found plenty of uses in espionage and erotica.

Although the uses for microphotography have declined in today’s digital world, there are still plenty of unique pieces of art around with these minuscule photographs, as well as a bustling collector culture around preserving some of the antique and historical microphotographs from before the turn of the century. There is also similar technology, like microfilm and microfiche, that were generally used to preserve data instead of creating art, although plenty of these are being converted to digital information storage now.


From Blog – Hackaday via this RSS feed

121


There was a time when print-in-place moving parts were a curiosity, but [Tomek] shows that things are now at a point where a hand-cranked turbine blower with integrated planetary gears can be entirely 3D printed. Some assembly is needed, but there is no added hardware beyond the printed parts. The blower is capable of decent airflow and can probably be optimized even further. Have a look at it work in the video below.

Every piece being 3D printed brings a few advantages. Prefer the hand crank on the other side? Simply mirror everything. Want a bigger version? Just scale everything up. Because all of the fasteners are printed as well as the parts, there’s no worry about external hardware no longer fitting oversized holes after scaling things up (scaling down might run into issues with tolerances, but if you manage an extra-small version, we’d love to hear about it).

There are a few good tips that are worth keeping in mind when it comes to print-in-place assemblies with moving parts. First, changing the seam location for each layer to ‘Random’ helps make moving parts smoother. This helps prevent the formation of a seam line, which can act as a little speed bump that gets in the way of smooth movement.

The other thing that helps is lubrication. A plastic-safe lubricant like PTFE-based Super Lube is a handy thing to have around the workshop and does wonders for smoothing out the action of 3D-printed moving parts. And we can attest that rubbing candle wax on mating surfaces works pretty well in a pinch.

One downside is that the blower is noisy in operation. 3D printed gears (and even printed bearings) can be effective, but do contribute to a distinct lack of silence compared to their purpose-built versions.

Still, a device like this is a sign of how far 3D printing has come, and how it enables projects that would otherwise remain an idea in a notebook. We do love 3D-printed gears.


From Blog – Hackaday via this RSS feed

122


Projector on left with red arrow pointing towards object, another red arrow points towards a piece of paper and then camera.

Taking a picture with a single photoresistor is a brain-breaking idea. But go deeper and imagine taking that same picture with the same photoresistor, but without even facing the object. [Jon Bumstead] did exactly that with compressed sensing and a projector. Incredibly, the resulting image is from the perspective of the projector, not the “camera”.

This camera setup is very similar to one we’ve seen before, but far more capable. The only required electronics are a small projector and a single photodiode. The secret sauce in this particular design lies in the pattern projected and the algorithm to parse the data.

In real life image on left with wave projected onto objects. Star shaped fourier transform in center which gets transformed into an actual greyscale image.

Video is projected onto the target in the form of sinusoidal waves. As these waves change and move their way across the object, the sensor picks up whatever intensity value is reflected. Putting all this data together allows us to create a measured Fourier transform. Use the inverse Fourier transform, and BOOM, you got yourself an image. Better yet, you can even take a picture indirectly. Anything becomes a mirror — even paper — when all you rely on is the average relative intensity of light. If you want to take pictures like this on your own, check out [Jon]’s Instructable.

The science behind this technique is similar to the math that powers CT scanners and VAM 3D printing.

Thanks, [MrSVCD], for the tip!


From Blog – Hackaday via this RSS feed

123


The humble piezo element is often used as little more than a buzzer in many projects. However, you can do more with them, as [Something Physical] demonstrates with their nifty piezo noise box. Check out the video (and audio) below.

The construction is simple enough, attractive in its own way, with a rugged junk-assembly sort of style. The video starts out by demonstrating the use of a piezo element hooked up as a simple contact microphone, before developing it into something more eclectic.

The basic concept: Mount the piezo element to a metal box fitted with a variety of oddball implements. What kind of implements? Spiralled copper wires, a spring, and parts of a whisk. When struck, plucked, or twanged, they conduct vibrations through the box, the microphone picks them up, and the box passes the sound on to other audio equipment.

It might seem frivolous, but it’s got some real value for avant-garde musical experimentation. In particular, if you’re looking for weird signals to feed into your effects rack or modular synth setup, this is a great place to start.

We’ve seen piezos put to other percussive uses before, too.


From Blog – Hackaday via this RSS feed

124


Ploppy knob

The world of custom mechanical keyboards is vibrant, with new designs emerging weekly. However, keyboards are just one way we interact with computers. Ploopy, an open-source hardware company, focuses on innovative user interface devices. Recently, [Colin] from Ploopy introduced their latest creation: the Ploopy Knob, a compact and thoughtfully designed control device.

At first glance, the Ploopy Knob’s low-profile design may seem unassuming. Housed in a 3D-printed enclosure roughly the size of a large wristwatch, it contains a custom PCB powered by a USB-C connection. At its core, an RP2040 chip runs QMK firmware, enabling users to easily customize the knob’s functions.

The knob’s smooth rotation is achieved through a 6705ZZ bearing, which connects the top and bottom halves and spans nearly the device’s full width to eliminate wobble. Unlike traditional designs, the Ploopy Knob uses no mechanical encoder or potentiometer shaft. Instead, an AS5600 magnetic encoder detects movement with remarkable precision. This 12-bit rotary encoder can sense rotations as fine as 0.088 degrees, offering 4096 distinct positions for highly accurate control.

True to Ploopy’s philosophy, the Knob is fully open-source. On its GitHub Page, you’ll find everything from 3D-printed case files to RP2040 firmware, along with detailed guides for assembly and programming. This transparency empowers users to modify and build their own versions. Thanks to [Colin] for sharing this innovative device—we’re excited to see more open-source hardware from Ploopy. For those curious about other unique human-machine interfaces, check out our coverage of similar projects. Ploopy also has designs for trackballs (jump up a level on GitHub and you’ll see they have many interesting designs).


From Blog – Hackaday via this RSS feed

125


For over a decade, most passports have contained an NFC chip that holds a set of electronically readable data about the document and its holder. This has resulted in a much quicker passage through some borders as automatic barriers can replace human officials, but at the same time, it adds an opaque layer to the process. Just what data is on your passport, and can you read it for yourself? [Terence Eden] wanted to find out.

The write-up explains what’s on the passport and how to access it. Surprisingly, it’s a straightforward process, unlike, for example, the NFC on a bank card. Security against drive-by scanning is provided by the key being printed on the passport, requiring the passport to be physically opened.

He notes that it’s not impossible to brute force this key, though doing so reveals little that’s not printed on the document. The write-up reveals a piece of general-purpose technical knowledge we should all know. However, there’s a question we’re left with that it doesn’t answer. If we can read the data on a passport chip, could a passport forger thus create a counterfeit one? If any readers are in the know, we’d be interested to hear more in the comments. If you are into NFC hacking, maybe you need a handy multitool.

Header: [Tony Webster], CC BY-SA 4.0.


From Blog – Hackaday via this RSS feed

view more: ‹ prev next ›